'Echo' is such a formidibal sounding tape delay/echo device it deserves a place here all of its own,even though it's only available in 'Live'
If you’re a fan of old-school tape delays like we are, you’re definitely going to enjoy messing around with Echo. As you’ll see in our accompanying video, there are a lot of options to twiddle.
We particularly like its raging feedback; the strange metallic and tonal effects you can achieve with short delay times; and you can also use Echo as a pseudo ‘retroiser’ using its Noise section. It might not replace your favourite third-party delay plugin, but it’s definitely useful to have as a bundled device inside Live.
We leave no stone unturned in this huge walkthrough on Echo.
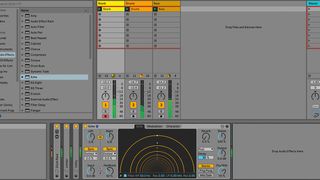
Step 1: Let’s take Ableton Live 10’s new Echo device for a spin. Live’s other onboard delay devices are rather utilitarian – except for Grain Delay, which is especially ‘out there’) – so it’s nice to see a substantial new delay to rival third-party options. Seeing as the device is a creative dub-style echo effect, we’ll load a new instance over a dry reggae ‘skank’ sound.
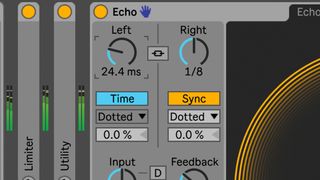
Step 2: Like any delay plugin, Echo’s Dry/Wet governs the balance of dry signal to delayed signal. We’ll keep that at around 50%. Up in Echo’s top left, you’ve got separate Left and Right controls to set delay time for the left and right channels. Sweep these around for tape-style repitching effects as the echoes spring to their new values.
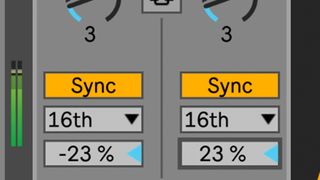
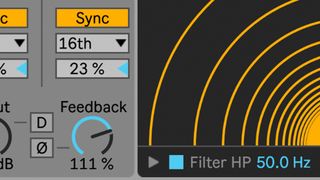
Step 3: Left and Right times are locked together by default, but you can decouple them by detoggling the yellow Link button that sits between. Both Left and Right times are synced to host tempo – detoggle one of the Sync buttons if you want to set delay time in milliseconds.
Step 4: Below the Sync buttons sit dropdown menus, where you click and choose one of four beat-synced modes. Under that, increase or decrease values in the boxes to offset either delay earlier or later by a few milliseconds. This is useful if the Left and Right delays are set to identical speeds, as you can create width. These work independently even when the delay times are locked.
Step 5: As you’d expect, you can crank up the Feedback knob to feed the delay outputs back into the inputs for more and more repeats. After the dial is pushed past around the 12 o’clock point, the feedback starts to self-oscillate, for those wild dub-style delay effects. This is definitely a fun, tweaker’s delay!
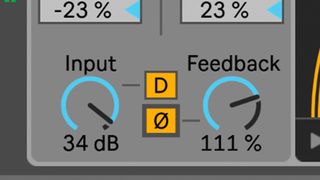
Step 6: Next, we’ll back down the Output and crank up the Input, which will distort the delay signal. Toggling the D button causes the input gain to also distort the dry signal – set the Dry/Wet to 0% to hear this more clearly. The Polarity button inverts the feedback’s polarity, and noticeably changes the delay’s character, especially with short delay settings.
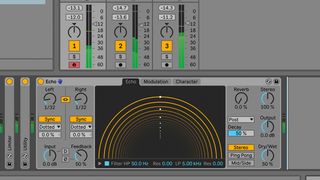
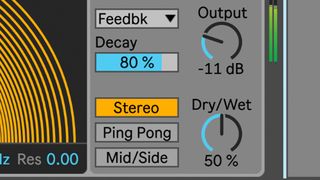
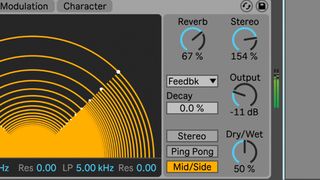
Step 7: In true Space Echo style, there’s also a simple Reverb onboard. Mix it in with the Reverb knob, and shape its length with the Decay slider. With the dropdown underneath, you can select where the reverb is placed in the signal path – Pre, Post or Feedback, with the latter getting pretty wild when settings are pushed.
Step 8: Flanking the reverb is a Stereo knob. Setting it to 0% monos the wet signal, 100% leaves the original width, and 200% gives maximum widening. Under that are three delay modes: there’s the default Stereo mode; Ping Pong is left-to-right as expected; and there’s a Mid/Side mode – when selected, the Left time becomes Mid, and the Right becomes Side.
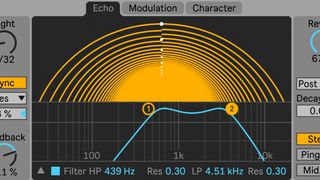
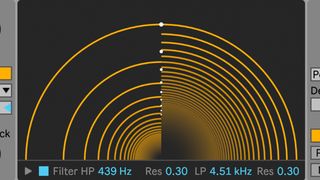
Step 9: At the bottom of Echo’s black centre section are controls for shaping the tone of the delay repeats with resonant high- and low-pass filters. HP and LP controls set the frequency of either filter, with Res boosting a peak around that frequency. Click the small arrow to pop out the filter display, where you can drag the filter nodes for more intuitive tweaking.
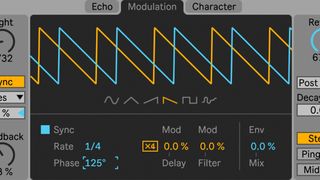
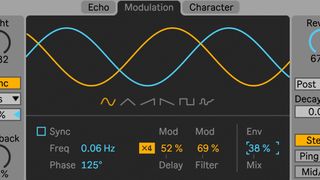
Step 10: Now to the Modulation tab, where you can modulate delay time and filter frequency with an LFO. The yellow and blue lines represent LFO shape for the left and right channels – click an icon to choose one of six LFO waves – and the relationship of these lines represents phase between L and R, altered with the Phase amount below.
Step 11: Sync switches modulation between clocked and free-running. Increase or decrease Mod > Delay to apply LFO modulation to the delay time and wobble pitch. Use Mod > Filter to modulate cutoff. Set the LFO’s Rate amount or punch the x4 toggle to scale that up by a factor of four. Push up Env to blend the LFO modulation with an envelope follower – 100% is envelope follower only.
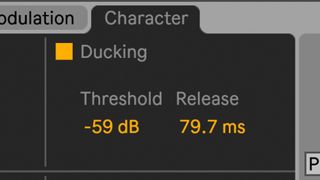
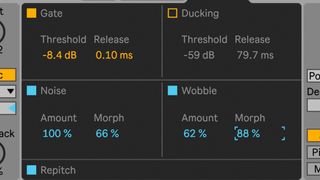
Step 12: Over in the Character section, you can alter the delay’s dynamics and flavour. Ducking does exactly as the name implies: it pulls down the wet signal when the input is triggered, a bit like sidechain compression. Pulling down the Threshold induces gain reduction, and Release sets how long it takes before the wet signal comes back up again. Time this with your song’s tempo for groovy pumping effects.
Step 13: Gate cuts any input signal below its Threshold value. Noise dials in grunge and fizz to simulate a noisy analogue delay – you can Morph between different types of noise. Wobble randomly wiggles delay time, and its Morph control sweeps between different mod types. The Repitch button at the bottom prevents the delays from changing pitch when delay times are altered.
Step 14: Just like with Wavetable, Echo’s visual feedback is particularly useful. Ableton call this centre dome-like display the Echo Tunnel: circular lines represent the repeats, the distance between lines is Time, and the density shows you Feedback.Review from
Musicradar